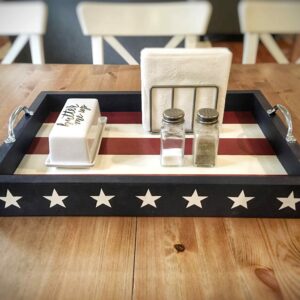
4th of July Serving Tray

New!

Build plan now available! Get your step-by-step guide for making your own 4th of July Serving Tray!
Check out our 4th of July Serving Tray Build Plan
Click Here

4th of July Serving Tray! 

blank

Originally published June 10, 2019. Updated June 18, 2022.

How is it already June?? The summer is going so fast. And that means 4th of July is just around the corner! 4th of July is one of our favorite holidays – a break from work, yummy cookouts, time with friends and family, and FiReWoRkS!!! But most of all, a time to remember, reflect on, and celebrate the freedom that we have today.

So we’ve been working on some fun 4th of July projects lately, and we’re excited to share this first one… a serving tray!

This is an easy DIY project that can be completed in a day, or over a weekend if you like to do bits and pieces at a time.

Purchase our build plan for dimensions, step-by-step instructions, and to download the Star Stencil! 

1. Cut & Paint 1x3s  

You’ll need 3 red pieces, 2 white pieces, and 4 blue pieces. Your red and white pieces will be the same size, depending on how big you want your tray. Your blue pieces will have two matching long sides and two matching short sides. 


blank


2. Glue the Base Pieces Together

Grab your glue, clamps, and patience! You’ll want to glue and clamp your red and white pieces together as tightly and as flat as possible. Let it dry completely. 

blank

3. Attach the Sides

Using your drill and screws (or nail gun if you have it!), attach all four sides to the base. 

This can be a little trick, but we’ve found it really helps to use clamps to help secure the sides in place while driving in the screws! 

blank

blank

4. Prep Star Stencil

Next grab or make a stencil for painting your stars on the tray – unless you’re super artistic and can free hand those suckers – then hats off to you! We provide a template you can print to create your stencil in our Build Plan! 

blank

5. Mask the sides & cut out stars

Using painters tape, cover the entire side of your tray (we did one side at a time). Lay your star stencil over the tape and secure with tape. Carefully cut the painters tape along the star stencil.
blank

blank

6. Paint Stars!

 Now you’re ready to paint your stars! Using white paint, apply several thin coats for crisp, bright stars. We did this on each side of the tray, but it’s totally up to you which sides you want the stars on. 

blank


blank

7. Attach Handles

If you’d like, apply a clear coat to protect the tray. A clear coat spray is great for this. 


Once dry, attach the handles. 


blank

Ta-da! Your very festive 4th of July Tray is complete! It’s so cute! Fill it with picnic supplies and utensils, snacks, décor, or whatever suits your fancy. Have fun with it! 

blank

blank

Cookies help us deliver the best experience on our website. By using our website, you agree to the use of cookies. Find out how we use cookies.